| MediaWiki:Sitenotice |
|---|
| 2026-03-12: Cocopedia.com is now using a new caching system that should make things faster. Please let me know if you encounter any new issues.
2026-03-15: MediaWiki has been reinstalled and the old database and files restored. It was pretty clogged up from being upgraded so many times since 2004. I am also testing out Cloudflare to see if it can prevent the 'bot assaults that took the site down last year. 2026-03-16: Special thanks to Don Barber for hosting a backup mirror of CoCopedia: https://cocopedia.dgb3.net |
Deluxe Joystick
| WELCOME |
|---|
| Looking for CoCo help? If you are trying to do something with your old Color Computer, read this quick reference. Want to contribute to this wiki? Be sure to read this first. This CoCo wiki project was started on October 29, 2004. --OS-9 Al Read-only mirror: https://cocopedia.dgb3.net |
See Recent Changes. | About this site. | Join the E-Mail List or Facebook Group. | Contact me with updates/questions.
This page was last updated on 09/4/2024. Total Pages: 751. Total Files: 999.
Home / Hardware - Deluxe Joystick
|
| |
| Name | Tandy Color Computer Deluxe Joystick |
|---|---|
| Date | October 1983 |
| Year | Patent Applied: Nov 5, 1982 Patent Granted: Dec. 25, 1984 |
| Interface | Joystick Port |
| Notes | Radio Shack Catalog Number 26-3012, 26-3012A, 26-3012B |
| Info Source | US Patent 4490710 |
| About the Hardware Info Box | |

History
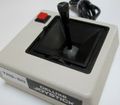
The Deluxe Joystick was released in October, 1983 by Radio Shack<ref>Tandy's Little Wonder 2nd. edition, p. 16</ref>. It differed from the original in a number of ways.
All joysticks sold by Tandy for the CoCo were analog joysticks
The Deluxe Joystick was offered in several versions for Color Computers:
- 26-3012 single red fire button, TRS-80 Deluxe Joystick label, and two same-length arms internally not supported on the opposite side from the potentiometer
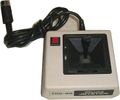
- 26-3012A two 'fire' buttons (a red one and a black one), TRS-80 Deluxe Joystick label, and two same-length arms internally not supported on the opposite side from the potentiometer
- 26-3012B two 'fire' buttons (a red one and a black one), Tandy Deluxe Joystick label, and two different length (long and short) arms internally where the long arm is supported by a peg on the opposite side of the potentiometer
The red button was button one, and corresponded to the button on the original joystick.

The two-button stick can be used on a CoCo 1 or 2, but the black button number 2 will not be functional as earlier Color Computers lacked the sixth hardware pin in the joystick port to test it.
Features and design
-
 Deluxe Joysticks
 -
 Deluxe Joysticks
 -
 IBM PC Jr and Deluxe Joysticks


In addition to having a second button, the base of the joystick is larger than the original regular joysticks.
More significantly, the Deluxe joystick included hardware that could automatically center the stick on the X axis, the Y axis, or both.
By holding the stick to the lower-right corner, flipping the unit over, and latching or unlatching two spring-loaded clamps internal to the stick, one could select which axes were self-centering and which were free-floating like the original joystick.
This feature allows the user to select the best stick configuration for whatever program they're using.
NOTE: The instruction to hold the stick to the corner is also molded into the plastic of the bottom base as a reminder when you flip the joystick over to adjust the tabs.
- For maze-type and platform games, gameplay is often enhanced with self-centering joysticks that more closely mimic a digital stick.
- For paint programs and games like Polaris where you are moving a cursor around on the screen, a free-floating stick is preferable.
- And for flight simulators, it is nice to have a throttle control that is centered in the X axis, free in the Y axis, and a control stick that is centered in both.
Though generally more robust than the original CoCo joystick, the centering mechanism in these joysticks is somewhat fragile and can break or come apart.
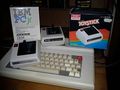
The design of the stick seems to be nearly identical to a stick marketed for the Apple II by Kraft, so it was probably licensed by Tandy.
A joystick of the same design was also branded by IBM for use on the PCJr.
Video
How it Works including Assembly Code
Repair
A view of the internals, including the same-length arms used in the earlier version of the Deluxe Joystick:
Multiple people have reported that the inner arms of the joystick break during shipping, possibly due to inadequate packaging.
Epoxy and Cyanoacrylate
A number of folks in the community suggested the following list of products as useful for repairing these plastic breaks.
- Versachem Plastic Welding System
- Araldyte
- Loctite
- JB Weld 8237 for plastic
- Gorilla super glue
- Plastizap
NOTE: These are not product endorsements, simply suggested options from the community which may help or inspire future repair efforts.
3D Printed Replacements
On Facebook, Scott Kelly posted 3d printable models of the arms that can be used to print replacements along with permission to print them.
Scott Kelley also posted them them Thingiverse along with a locking switch:
- Tandy Deluxe Joystick Horizontal (short) arm
- Tandy Deluxe Joystick Vertical (long) arm
- Tandy Deluxe Joystick Axis Lock Tab
Paul Fiscarelli also designed a replacement lock tab available through Thingiverse:
NOTE: It is not known if the axis arms are interchangeable between models due to possible changes in the size of potentiometer shafts and other factors.
However it does appear the earlier cases do have the internal molded-in support post.
Barry Nelson suggests:
- you may have to drill out the metal pin holes with a 7/64" bit to allow free movement of the metal pin through the axis arm.
- [1] is one printing service which can print in multiple materials with 100% solid infill for strength.
External Links
- U.S. Patent 4490710 Control Stick Assembly by Kraft Systems, Inc.
- Manual at the Color Computer Archive
- Programming reading joystick
- Hi-Res Software-only Joystick Driver by John Kowalski, Robert Gault, and Nick Marentes
References
<references />
