MediaWiki:Sitenotice:
2024-03-02: The wiki ran out of disk space, so things were not working. This has been resolved by adding another 5GB of quota ;-) Thanks to Tim Lindner for reporting the issues.
2020-05-17: If a page gives you an error about some revision not being found, just EDIT the page and the old page should appear in the editor. If it does, just SAVE that and the page should be restored. OS-9 Al (talk) 12:22, 17 May 2020 (CDT)
CoCo repack in PC: Difference between revisions
Luis46coco (talk | contribs) mNo edit summary |
Luis46coco (talk | contribs) mNo edit summary |
||
| Line 30: | Line 30: | ||
=="CocoRepack" - How To Transfer A Coco Into an AT Style Case== | =="CocoRepack" - How To Transfer A Coco Into an AT Style Case== | ||
From: | From: http://web.archive.org/web/20021223151227/http://zeppelin.tzo.cc/coco/coco?page=Howto&selection=atcase | ||
Revision as of 14:41, 26 October 2014
| WELCOME |
|---|
| Looking for CoCo help? If you are trying to do something with your old Color Computer, read this quick reference. Want to contribute to this wiki? Be sure to read this first. This CoCo wiki project was started on October 29, 2004. --OS-9 Al |
See Recent Changes. | About this site. | Join the E-Mail List or Facebook Group. | Contact me with updates/questions.
This page was last updated on 10/26/2014. Total Pages: 729. Total Files: 993.
Home / Hardware - CoCo repack in PC
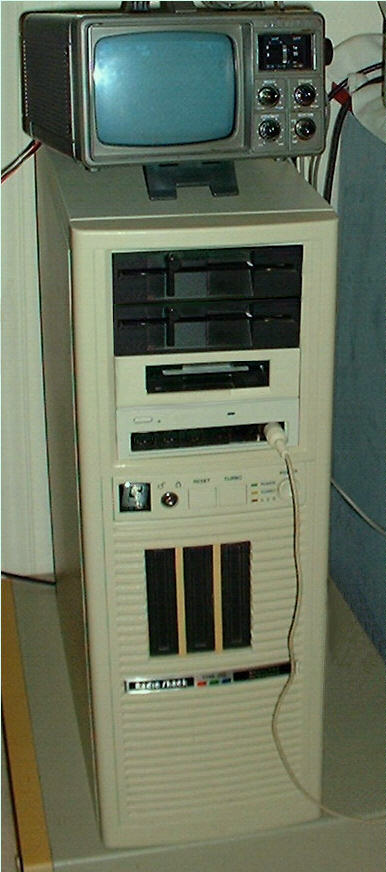
My CoCo3 (one of five, actually) in it's new home, a very large tower AT case. The case was wide enough (8� inches) to allow the MPI to be mounted inside the front cover. The fourth slot is not visible because the disk controller is mounted inside the case. For the cartridge doors, I sacrificed the case from a dead multipak and cut the entire door assembly out of it. It's held in the PC's front cover by some small screws and hot-melt glue (wonderful stuff).
The "sans CD-Rom" repack adapter includes my clone of the Tandy Hi-Res interface. I wanted it on the same circuit board as the other I/O connectors, for obvious reasons. There's a switch, barely visible between the two rightmost sockets, to choose between the left joystick socket and the Hi-Res socket.
Before:
After:
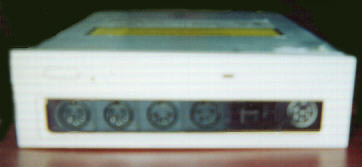
CoCo repack adapter
In a CD / DVD, you can put the connectors for the coconut, in a PC
joystick, cassette, RS-232
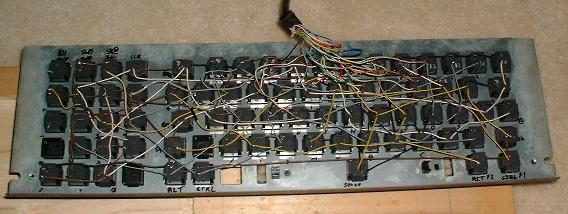
CoCo repack Keyboard
My homemade keyboard... still not quite complete after several years. (I still need to make a top cover for it). Click for a closer view of the wiring. I forget what the keyboard came out of, but it's an old one with a good solid feel to it. It took me a little time to wire up but it was well worth it. It works great and I love it!
"CocoRepack" - How To Transfer A Coco Into an AT Style Case
ATCoCo - Putting it all in one Box
                    By Mike Haaland - 72300,1433
                 Internet:
      Written: December 14, 1988    Updated: January 15, 1989

   This article is  the procedure I have  used in order to get the
   clutter of  Computer components off  my desk and  into a single
   AT Clone case.  It has been put together and distributed to aid
   those CoCo  owners who are tired  of the mess,  to do the same.
   I cannot take  responsibility for any damage you may do to your
   system while attempting the same project  described in the text
   that follows.  The need for such a  transplant  depends totally
   on your own tastes.
   The nicest thing about the ATCoCo (CoCo in an IBM type AT case)
   is  you  have so much  room for  drives,  packs, etc. that your
   system will be nice and neat without  the need of having cables
   running all over the place.
Into the ATCoCo you have room for:
        Three half-height disk drives
        A full or half-height Hard Drive
        The CoCo Motherboard  (main circuit board)
        An MPI (Multi-Pak Interface)  RS Cat.# (26-3124)
        Four Paks (fit in four slots of the MPI)
   This is what I have installed into my ATCoCo!  If I can figure
   out how  to get the modem in there, I'll put it in there too!!
   My system has been running  this way for  over two months with
   no problems at all.
NEEDED PARTS
Before you can get started you will need:
1) An AT Clone case and power supply.
   (This case must be 6 inches tall inside.  If you have an XT case
   you can still use the  USING THE CLONE POWER SUPPLY  section but
   the actual installation will differ, as there is  not sufficient
   room in the XT Case to put the MPI (Multi-Pak Interface) on it's
   edge as described)
2) A set of all the connectors on the back of the coco, both male
   and female. ( Including  the  RGB connector if you  are using an
   RGB monitor ).  For  the  cleanest  installation  get the female
   chassis mount connectors.
3) Wire to make up the extender cables for the Cassette, Joystick,
and serial ports.
4) A short ( 4 to 6 inch ) 40 pin extender cable that will go from
   the CoCo  motherboard  to the  MPI. (Or you can make your own by
   using the 40 plug on the board and wiring a ribbon cable).
5) A VOM meter.
6) The ability to use a soldering iron.
7) GUTS! To void your warranty!!!!!!
8) SOME KIND OF EXTERNAL KEYBOARD ADAPTER *
   I strongly suggest getting the IBM XT 101 keyboard adapter that
   Bob Puppo  builds.  Or get a Keyboard extender cable.  Both can
   be found from various distributors in RAINBOW magazine.
   (If you ever received  CoCo-Ads from PD  Software  there was an
   article in the Aug. '87 issue entitled "Detached Keyboard" that
   will describe how to make an external keyboard setup yourself.)
PREPARATION
Make up the extender cables for the ports and check that they
work properly. Each cable will need to be about 18 inches long.
Make the extender cable for the RGB plug.
USING THE CLONE POWER SUPPLY (150W or 200W)
This is a Copy of a message on CompuServe that I used as an example to hook my CoCo 3 up to an IBM Clone 200 watt power supply. It was written by Bruce Isted 76625,2237 and the MPI stuff was what I did.
COCO (Motherboard)
1) Remove Q1 (KTD880-main regulator power transistor) from the COCO 3.
2) Connect the external PS ground to pin 8 of IC8 (SC77527) or other
ground point on the COCO 3.
3) Connect the external PS +12VDC to pin 16 of IC8 (SC77527) or to the
cathode (positive) end of D1 or D2.
4) Connect the external PS -12VDC to pin 15 of IC8 (SC77527) or to the
anode (negative) end of D3 or D4.
5) Connect the external PS +5VDC to where the emitter (output) of Q1
  used  to be.  This is the  pin on Q1 that connects directly to both
  R19 (51 Ohm, 1/4W) and R20 (0.1 Ohm, 1W).
6) Solder a jumper wire from the cathode (positive) end of D2 to the
  anode (negative) end of  D14  to provide +12VDC to the input of the
  RF's +8VDC regulator.  This was previously  accomplished  via an AC
  coupled capacitor (C62) and  half wave  rectifier  (D13, D14),  but
  there is no longer AC on the board.
  By removing  Q1,  but still  applying +/- 12VDC to  IC8  (SC77527),
  you fool IC8 into thinking it is  doing the +5VDC regulation, which
  does  no harm as the voltage control (to the base of Q1) output has
  been disconnected.  The  internal -5VDC regulation is still done by
  IC8, which is necessary for cassette and serial (bit banger) I/O.
MPI (Multi-Pak Interface) RS Cat # (26-3124)
  This is how I hooked a Multi-Pak  Interface, ( cat # 26-3124 ) the
  newer small  white model with the satellite board modification for
  the COCO 3, to the same 200W IBM Clone power supply.
To hookup a MPI (Multi-pak) to the same power supply.
1) Pull IC9 (1723CP), R7 (0.47, 2W), and C30 (1000P). (I cut out C30
  so I could get to IC9 with a pair of wire cutters).   Also remove
  the on/off switch.
2) Connect the external PS GROUND to any ground on the MPI.
3) Connect the external PS +12VDC to the solder pad in front of
  slot 1 in the MPI labeled 2.  This pad is jumpered to all PIN 2's
  of the MPI slots. (Only  needed if using an older disk controller
  that needs 12VDC)*
4) Connect the external PS -12VDC to the cathode (positive) end of
  D1 labeled "-12V TP3".   This  will  supply -12VDC to all PIN 1's
  of the MPI slots. (Only needed if  using an older disk controller
  that needs 12VDC)*
5) Connect the external PS +5VDC to the solder pad on the right of
  slot 1 of the MPI labeled "+5V TP1".  This will supply +5V to all
  PIN 9's of the MPI.
 *
  This modification has worked for me for about 8 weeks so far with
  no problems at all.  NOTE: If you don't have any peripherals that
  need 12VDC to power them you may skip steps 3 and 4.  Some of the
  older disk controllers DO need the 12VDC from the MPI!!!
INSTALLATION
Remove you CoCo motherboard and MPI from their cases.
   Lay your  CoCo motherboard in the AT case  with the  ROMPAK slot
   facing away from  the drives  and the plugs facing the  front of
   the AT case, as far back in the case as possible.
Mark where the four mounting holes on the coco are on the case.
Drill out the holes in the case.
   You can  either mount  the coco  with the plastic  legs supplied
   with the case  or  build your own mounts using a small  block of
   wood under  each hole.  Keep the  CoCo  off  the  bottom  of the
   case ( about 1/8 to 1/4 inch ).  This will  give you enough room
   to run the DIN  plug extension  cables under  the board and will
   also allow the AT fan cool the motherboard.
   Put the MPI in the left hand  front corner of  the case with the
   slots pointing in  and the card edge  that connects  to the coco
   towards the back.  ( Put electrical  tape  over  the  components
   that may be  easily  shorted to ground on the bottom edge of the
   MPI such as D1)
   If you  have a small  extender  ribbon connector  for the 40 pin
   ROMPAK slot on  the coco, you can see how easily you can connect
   the MPI to the CoCo.  If you  want to make up your own, you will
   have to:
     De-Solder the card edge  connector and remove it.  Be careful,
     you will need it later!!    Solder a ribbon cable to where the
     connector  was.  Solder the other end of the cable to the card
     edge  connector.  ( Or use a small pre-drilled printed circuit
     board  and mount the  card edge  connector  to it and then run
     the ribbon to that). Be sure pin 1 goes to pin 1 etc.
   The last thing you will need to do is use a piece of sheet metal
   to mount all those connector on.  I cut out part of the PC  card
   slots and made a plate to mount them.  Plug everything together,
   and double check all the wiring. Mount the drives in their slots
   and hook  them up to the  power supply.  Plug your various packs
into the MPI. And you should be done.
A FEW EXTRA GOODIES
   Now that you have your ATCoCo all in the box and connected, here
   are a couple of "extras" that make you system  more professional
   looking.
   There  are usually three lights, a momentary reset button, a two
   pole (on/off) 'Turbo' button,  and a two pole  key switch on the
   case. I have found some uses for some of them and here they are.
   If you have a hard drive you can easily use one of the lights to
   indicate drive  access by  simply finding where the drive access
   light pins are on your HD and connecting them up.  This is a big
   help if  you have used the  fourth slot (behind the front cover)
   to put your HD in.
   You can wire one of the lights to indicate power on by  hooking
   +5VDC from the power supply or and the other side to ground.

   The 'Reset' switch  can be wired up  to where the original CoCo
   reset  button is.  Remember, you can't  get to the original one
   now!  Simply remove the  old reset button from the CoCo and you
   can wire the new button to where  the reset button was.  If you
   can,  get the male pins that will plug in to the connector from
   any electronics supply store  and mount them to where the reset
   button was and plug the switch to that.  This will make it easy
   to remove later if you need to work on you CoCo.
   Now if you can, remove the plaque from you old CoCo 3 top cover,
   the one that says  'TANDY 128K COLOR COMPUTER 3' and mount that
   on the front of the new ATCoCo Case. (For the completed look!!)
CAUTION AND DISCLAIMER
   This text  file is how I did  it and I assume  no responsibility
   whatsoever  for anyone following  the procedure  described above.
If you mess up your CoCo, it's your own fault, not mine. By opening the original case on your CoCo or MPI you VOID your warranty. If I can be of any assistance to you, you are welcome to leave me mail here on the OS9 sig of Compuserve or on GEnie my mail address is HAALAND.
Copyright (c) 1988 by Mike Haaland - 72300,1433 Internet: mhaaland@hypertech.com


