MediaWiki:Sitenotice:
2024-03-02: The wiki ran out of disk space, so things were not working. This has been resolved by adding another 5GB of quota ;-) Thanks to Tim Lindner for reporting the issues.
2020-05-17: If a page gives you an error about some revision not being found, just EDIT the page and the old page should appear in the editor. If it does, just SAVE that and the page should be restored. OS-9 Al (talk) 12:22, 17 May 2020 (CDT)
Disk Drive power LED
| WELCOME |
|---|
| Looking for CoCo help? If you are trying to do something with your old Color Computer, read this quick reference. Want to contribute to this wiki? Be sure to read this first. This CoCo wiki project was started on October 29, 2004. --OS-9 Al |
See Recent Changes. | About this site. | Join the E-Mail List or Facebook Group. | Contact me with updates/questions.
This page was last updated on 05/12/2023. Total Pages: 729. Total Files: 993.
Home / Hardware - Disk Drive power LED
I don't know how many times I forgot to turn off my CoCo and/or the external drive bay, leaving them cooking over night. A power LED was one of the first things I added to my CoCo after the warranty expired.
I'm a big fan of making things look as professional as possible... making it look like it came from the factory that way... so when it came to adding a power indicator to the external drive bay, I didn't want to drill any holes in the case. I had some 2-color LED's in my parts bin and figured out a beautiful solution. A green LED to indicate power, which turns red when the drive is in use.
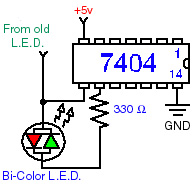
The first thing you'll need is a 2-color LED that physically matches the LED in your floppy drive. Mine was a standard T-1 3/4, very easy to locate. You'll also need a 7404 inverter. I put mine on a small circuit board which fit neatly on the back of my floppy drive. A 330 ohm � watt resistor, some wire (the wire-wrapping kind works well) and some small heat-shrink tubing complete the list
Carefully disassemble the floppy drive to the extent necessary to extract the original LED. If you don't want to desolder it, you can cut the leads. One lead of the original LED is the control line, which needs to be wired to the circuit. Since floppy drives are not all the same, you may have to try them one at a time to get the right one. If you can access the LED with a voltmeter while accessing the floppy drive, you will see that one side of the LED stays constant and the other side changes voltage. This is the line that controls our 2 color LED.
Now put the 2 color LED in place of the original and run wires from the LED leads and the control line from the floppy drive back to the inverter chip. Make sure all the leads are insulated... wouldn't want to short anything out. Connect the wires to the circuit in accordance with the schematic. You can get the +5v and GND from right behind the power connector.
Reassemble everything and you're ready for a 'smoke' test. If you turn it on and no smoke comes out, you done good. If everything works right, you done great! If your LED is red and turns green when the drive is accessed, reverse the LED's connections to the inverter. If you have a three prong LED, the common lead goes to the resistor to ground and the other two leads go to the inverter.
Another great use for one of your unused inverters is to let you invert the Side-Select line and use a switch to toggle between normal and inverted signal. This basically lets you flip your disk over without removing it from the drive. Great for 2-disk games like Carmen SanDiego or Microscopic Mission. Also great because it works regardless of OS
